
Sunday, February 28, 2010


Project Robo Feb 28, 2010

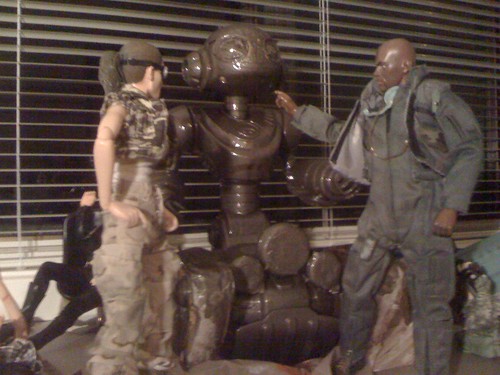
PROJECT ROBO is complete!
I really like the way this project turned out. There were some fun challenges and items to work out. The use of foam core board helped the project along. Above all, I was extremely excited about taking the project from thought to final.
Comments welcome, as always.
MORE PHOTOS ON FLICKR
http://www.flickr.com/photos/malcojojo/sets/72157623529074532/


Friday, February 26, 2010
Winch Box
Today was the big winch box day. I had the basic idea and thought that the process was going to be a slam dunk. However, once I had everything out, I saw that it was going to require a little more effort than I had planned on.
I have worked with foam core in the past and have the plan to get it curved. Scoring through half the foam board then splitting it works really well. Patience and careful cutting will do the trick. But once I saw the space I was working with, things became a bit tricky.
The remote control pickup receptors are on RoboRover's back, so I could not build the pack on his back like I had originally planned. I thought through the desired outcome and thought that the lower portion of the frame would work out well for the box build.
After scoring the foam core, I measured the space where it needed to fit and cut it down to match. I chopped the lower portion to fit around the robot body.
The rest was just detail. A few bits of foam core for the sides worked out well, the use of various bits and pieces like a radio set for a controller box worked like a charm, then a black wash over the whole thing made for a great match for the rest of the piece.
More detail is needed, but it's a grand start.


Wednesday, February 24, 2010
1/6 Scale Signage

 I so need this for my zombie diorama displays!
They have basically done all the legwork for you, taking cool zombie outbreak art and slipping it all into a nice pack for you.
Of course, if you are good at math, have a color printer and are not super honest, you can just print the images here and call it good. But, I think I'll toss some cash at these folks. :)
http://magcloud.com/browse/Issue/51066
- Publisher:
- Date:
- 08 Dec 2009
- Size:
- 8.25" × 10.75"
12 pages
Additional SIXTHSCALE mags here:
http://magcloud.com/user/SIXTHSCALEMagazine


Monday, February 22, 2010
Painting Round Two: Dull it down

After spraying the bot, I saw that the spray paint was too shiny for the look that I wanted for the project. The simple way around the gloss - besides going back in time and changing the type of paint used to spray the bot - was to do a wash of flat to counter.


The wash went on and it really hit the mark that I was trying to hit. Dirty black and ready for more dirt and weathering.

Next steps:
• Additional painting details
• Additional weathering
• Backpack winch
• Tank minesweeper front
• Decals
• Proper photo shoot
Sunday, February 14, 2010
Spray it up!
Well, time to jump in with both feet and spray this sucker. I don't have a proper spaying set up, but managed to improvise a bit during a bout of good weather outside.
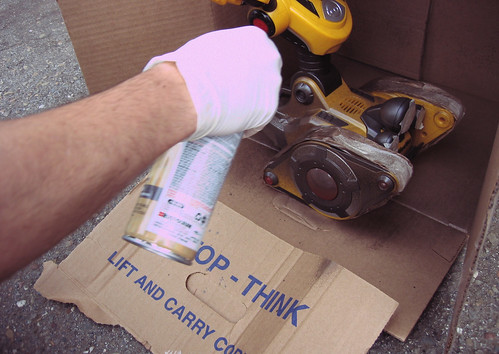
I masked off areas of the bot that I wanted to remain clear and open, making sure I really thought through what outcome I wanted before doing a final commit. I tried to leave some corners of the tape off for an easier removal.
Having just moved, I had a bountiful harvest of boxes laying around, so I grabbed a good sized one to use for the spraying to avoid over-spray of the surrounding area. Gloves and mask on, I was good to go.
One of the things I'm working on is patience and planning when it comes to these projects. I'm better than I was, but still tend to rush through the planning phase to get to the outcome. I got a spray paint that was good for plastic and contained both the paint and primer, but I neglected to prep the surface properly, so the pain had a difficult time clinging to the surface in certain areas. I plan to work around these “thing areas” with a brush and some detail work I had already planned on, but a good solid base coat would have been better. Also, the somewhat glossy nature of the paint itself is giving the bot a glossier look than I had planned on, but I plan to work around that as well.
I think some of these prep-steps would have done wonders:
http://www.ehow.com/how_4865991_prep-plastic-paint.html
And now you know, and knowing is half the battle. :) I'm still really happy with the results.
Friday, February 12, 2010
Masks

It's very important to wear protective masks when dealing with spray paint or other toxins. Latex gloves are a must as well if you like to keep clean.
Thursday, February 11, 2010
 The first thing that had to go on the robot was it's super annoying voicebox!
The RoboRover chirps out little sayings like mad and made me crazy.
"Hey, Buddy! Let's go EXPLORE!"
No.
The four screws on the bottom came out with ease and released the bottom section. I wanted to be sure not to ruin the treads and motor action, so I just went slow and steady.
Once open, I was able to see the speaker and the wires that activated it. I clipped the wires, but
 tried to do it so that if I had to, I could reconnect them. THAT is doubtful. The voice was horrid.
Overhaul

"This baby is close, but we can make it better."
Julianne Wood and Noah Welling go over their plan of action.


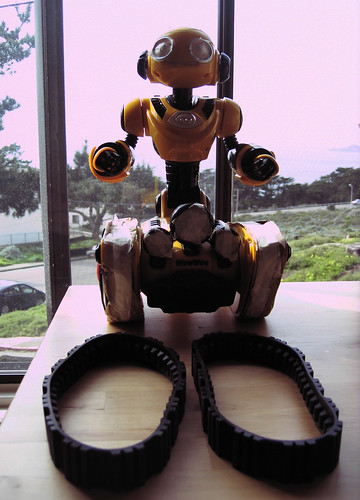
RoboRover Kitbash - GO!

This will be my largest project to date.
The game plan is to take the WowWee RoboRover remote control toy and kitbash it into something more along the lines of a Science Fiction robot assistant for a small team.
I plan to post images as I move along through the process. Comments welcome!


The inspiration: threeA toys and their amazing figures!
KITE
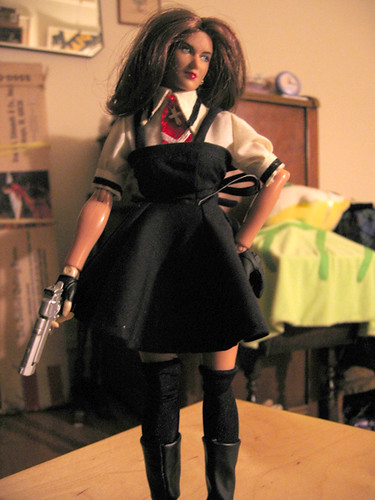
Inspired by the anime KITE, I put this together with a Cy Girl figure and more clothes from AZONE.
It's your classic schoolgirl with gun figure, but the AZONE clothing helped take it up to a somewhat classier level than something similar from Triad - the Lola figure.
Winged Warrior
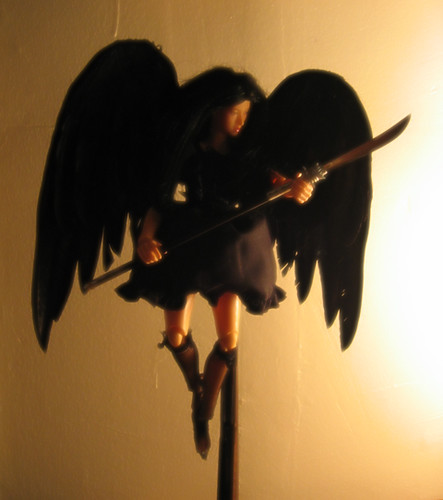
I really had a grand time with this project!
I took a Cy Girl figure as the base. I purchased a babydoll dress and stockings from a Japanese company called AZONE (http://www.hlj.com/) and topped it all off with a gachapon sword staff.
It was coming together nicely as a figure, but it was a bore as well. Cute girl in dress with weapon - ok. Cute girl in dress with weapon and WINGS - cool.
After a good amount of hunting, I managed to find a bird prop around Halloween time. The wings were spread wide. It was perfect.
I cut them off WITH the back portion of the bird for added support. The whole section is strapped to the figure under the dress which is open at the back.
More photos coming soon.
Wednesday, February 10, 2010
Hero Story Flickr Set
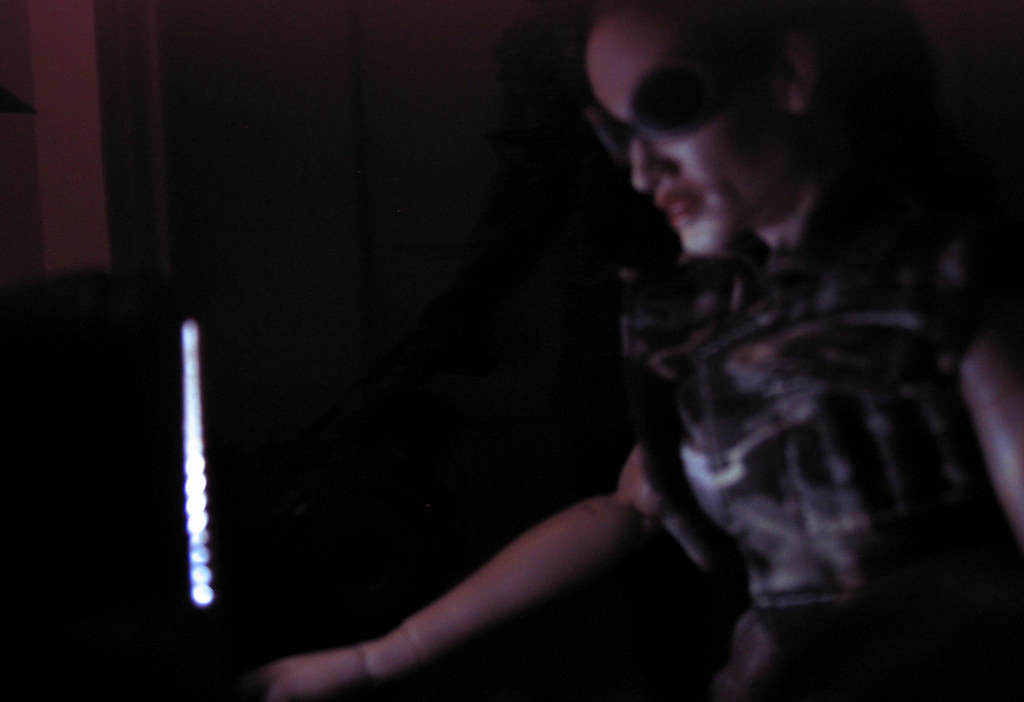
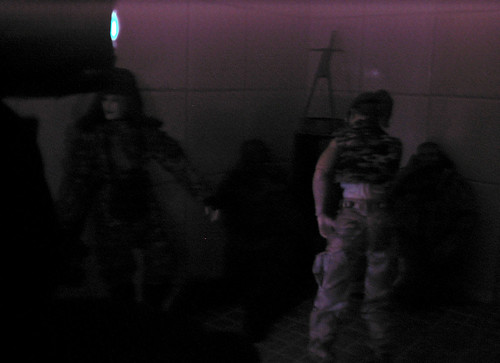
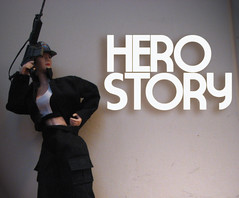 This set story was what it looks like after everything is al wrapped up, the job is done, and the "heroes" get to relax and pat each other on the back for a job well done. :)
In the "story", three factions come together to foil the deeds of some nameless evil.
Thanks to Robyn and Heroes Club for some great weathering tips on the weapons and clothing. A little grime goes a LONG way for making things look more real in the 1/6th scale realm!
http://www.flickr.com/photos/malcojojo/sets/72157622216154764/
The Golden Skull Flickr Set

The Golden Skull set was going to be a diorama for my 1/6th scale figures. I made it out of Fimo clay for the most part, adding some pearls and bits to flesh out the look.
The skull was painted with a flat, golden pearl nail polish that gave it a nice gold look.
When I was done, the whole of the set was just too small to make an impressive 1/6th scale addition. I shot pictures, saved the skull, and tost the rest in the garbage before I had time to change my mind about getting rid of it. A fun process overall.
http://www.flickr.com/photos/malcojojo/sets/72157622191010178/
Zombie Journal Flickr Set
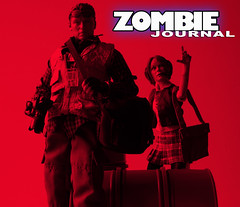
The Zombie Journal set (2009)
Figures:
Subject 1025: The Babysitter from Sideshow
War Journalist from Toymaster
If I had more space, I would love to have a full set up with these figures with a space for them to be shown. Currently, they are on display on a shelf at work. :) Works well, but a display room would be fun.
http://www.flickr.com/photos/malcojojo/sets/72157621843034132/

.


One Six, GO!
One Six GO! is my 1/6th scale figure blog. I'm not a hardcore 1/6th scale collector or builder, but I do love the scale and the look of these figures and I do have past and current projects I want to share.
I'll post images and progress as I roll along.
GO!
I'll post images and progress as I roll along.
GO!
Subscribe to:
Posts (Atom)